그럴때 유용한 Try-Catch문이 있다! 오늘은 이 문법을 공부하면서 개발을 진행해보자.
1. 먼저 기존에 UI 작업 -> 새로운 확장 메서드 추가 - ShowActionUI( )
    // 플레이어 턴 UI 표시
    public void ShowActionUI(System.Action attackCallback, System.Action moveCallback)
    {
        playerActionUI.SetActive(true);
        onAttackSelected = attackCallback;
        onMoveSelected = moveCallback;
    }
이제는 UI 표시가 공격, 이동 뿐 아니라 스킬들 까지 추가해야 되서 오버로딩으로 메서드를 만들었다!
 // UI 표시 버튼 리스트 버전
 public void ShowActionUI(BasePlayer player, SkillManager skillManager,
 				System.Action attackCallback, System.Action moveCallback)
 {
     playerActionUI.SetActive(true);
     onAttackSelected = attackCallback;
     onMoveSelected = moveCallback;

     // 기존 스킬 버튼 삭제
     ClearSkillButtons();

     // 플레이어가 선택한 스킬 가져오기
     if (skillManager.playerSkills.TryGetValue(player, out List<Player_SkillData> selectedSkills))
     {
         foreach (var skill in selectedSkills)
         {
             CreateSkillButton(skill);
         }
     }
 }

 // 스킬 버튼 동적 생성
 private void CreateSkillButton(Player_SkillData skill)
 {
     GameObject newButtonObj = Instantiate(skillButtonPrefab, skillButtonParent);
     Button newButton = newButtonObj.GetComponent<Button>();
     newButton.GetComponentInChildren<Text>().text = skill.skill_Name; // 버튼 텍스트 설정
     newButton.onClick.AddListener(() => UseSkill(skill));
     skillButtons.Add(newButton);
 }


 // 스킬 버튼 삭제 (UI 초기화)
 private void ClearSkillButtons()
 {
     foreach (var button in skillButtons)
     {
         Destroy(button.gameObject);
     }
     skillButtons.Clear();
 }
ShowActionUI() 메서드를 확인하면 매개변수들을 추가한 확장된 메서드로 개발할려고 한다.
2. 호출받는 메서드 확인: StartPlayerTurn( )
    // 플레이어 턴 시작
    public void StartPlayerTurn()
    {
        playerActionUI.ShowActionUI(currentPlayer, skillManager, OnAttackSelected, OnMoveSelected);
        MouseClick();
    }
해당 UI 메서드는 플레이어의 턴이 시작되면 호출받는다.
(MouseClick() 은 임의로 만들었던 마우스 클릭 메서드이다.)
이제 오버로딩으로 확장한 메서드를 테스트할 차례이다.
3. Try-Catch 문을 사용하기: StartPlayerTurn()
    // 플레이어 턴 시작
    public void StartPlayerTurn()
    {
        try
        {
            playerActionUI.ShowActionUI(currentPlayer, skillManager, OnAttackSelected, OnMoveSelected);
        }
        catch (System.Exception e)
        {
            Debug.LogWarning($"오류 발생: {e.Message}, 기본 UI를 호출.");
            playerActionUI.ShowActionUI(OnAttackSelected, OnMoveSelected);
        }
        finally
        {
            MouseClick();
        }
    }
try { } : 내부에 있는 코드를 실행해본다. 오류가 발생하지 않으면 정상적으로 작동한다.
catch { } : 오류가 발생하면 Catch문의 내용이 실행된다.
finally { } : try-catch문과 관계없이 항상 실행된다.
테스트 결과
try-catch문 결과
아직 UI 관련된 내용을 하이어라키에 만들지 않았으므로
오류가 발생하기 때문에 Catch문을 통해서 기존 UI 메서드로 실행된다.
개발함에 있어서 확장이라는 개념에서 기존에 정상작동 하는 기능들은 건들지 말아야 하기 때문에
    public bool skill_Seleted = false;  // 선택 유무
    public string skill_Name;   // 스킬명
    public int skill_Damage;    // 데미지
    public int skill_Crit;      // 치명타율
    public float skill_Heal;    // 힐량

    public Player_SkillType skill_Type; // 스킬 타입
    public Sprite skill_sprite;     // 스킬 아이콘

    public List<Vector2Int> skill_useablePos = new List<Vector2Int>(); // 사용 위치 리스트
    public List<Vector2Int> skill_targetPos = new List<Vector2Int>();  // 공격 대상 리스트
// 스킬 빌더 패턴
public class skill_Builder
{
private Player_SkillData skill = new Player_SkillData();
public skill_Builder SetName(string name) { skill.skill_Name = name; return this; }
public skill_Builder SetDamage(int damage) { skill.skill_Damage = damage; return this; }
public skill_Builder SetHeal(float heal) { skill.skill_Heal = heal; return this; }
public skill_Builder SetCrit(int crit) { skill.skill_Crit = crit; return this; }
public skill_Builder SetType(Player_SkillType type) { skill.skill_Type = type; return this; }
public skill_Builder SetIcon(Sprite icon) { skill.skill_sprite = icon; return this; }
public skill_Builder SetUseablePositions(params Vector2Int[] positions)
{
skill.skill_useablePos.AddRange(positions);
return this;
}
public skill_Builder SetTargetPositions(params Vector2Int[] positions)
{
skill.skill_targetPos.AddRange(positions);
return this;
}
public Player_SkillData Build() { return skill; }
}
4. 플레이어 캐릭터 클래스에서 빌더 패턴으로 스킬을 추가해보자!
 // 테스트용 기술 생성해보기
 public void InitializeSkills()
 {
     allSkills.Add(new Player_SkillData.skill_Builder()
         .SetName("내려찍기")
         .SetDamage(10)
         .SetCrit(15)
         .SetType(Player_SkillType.type_Melee)
         .SetUseablePositions(new Vector2Int(0, 1), new Vector2Int(1, 1))  // 사용 가능 위치
         .SetTargetPositions(new Vector2Int(0, 2), new Vector2Int(1, 2))   // 두 위치 중 지정 가능
         .Build()
         );

     allSkills.Add(new Player_SkillData.skill_Builder()
         .SetName("Gun 공격")
         .SetDamage(12)
         .SetCrit(10)
         .SetType(Player_SkillType.type_Range)
         .SetUseablePositions(new Vector2Int(0, 0), new Vector2Int(1, 0))  // 사용 가능 위치
         .SetTargetPositions(new Vector2Int(0, 2), new Vector2Int(0, 3), new Vector2Int(1, 2), new Vector2Int(1, 3)) // 대상 위치
         .Build()
         );

     allSkills.Add(new Player_SkillData.skill_Builder()
        .SetName("자힐")
        .SetHeal(10)
        .SetCrit(5)
        .SetType(Player_SkillType.type_Heal)
        .SetUseablePositions(new Vector2Int(0, 0), new Vector2Int(0, 1), new Vector2Int(1, 0), new Vector2Int(1, 1))
        .Build()
        );

     allSkills.Add(new Player_SkillData.skill_Builder()
       .SetName("자가 버프형")
       .SetDamage(0)
       .SetCrit(0)
       .SetType(Player_SkillType.type_Buff)
       .SetUseablePositions(new Vector2Int(0, 0), new Vector2Int(1, 0), new Vector2Int(0, 1), new Vector2Int(1, 1))
       .Build()
       );

     allSkills.Add(new Player_SkillData.skill_Builder()
      .SetName("필살기 전체공격형")
      .SetDamage(13)
      .SetCrit(20)
      .SetType(Player_SkillType.type_Melee)
      .SetUseablePositions(new Vector2Int(0, 1), new Vector2Int(1, 1))
      .SetTargetPositions(  // 광역기: 전체 공격 가능
         new Vector2Int(0, 2), new Vector2Int(0, 3), new Vector2Int(1, 2), new Vector2Int(1, 3))
      .Build()
      );
    // 필요한 정보
    private enum PlayerAction { None, Attack, Move, Item }
    private PlayerAction currentAction = PlayerAction.None; // 기본상태는 일단 None;
2. 행동 상태에 따라 실행하는 코드 틀을 잡는다.
switch (currentAction)
{
    case PlayerAction.Attack:
        break;
    case PlayerAction.Move:
        break;
    case PlayerAction.Item:
        break;
    default:
        Debug.Log("행동을 선택해주세요");
        break;
}
2-2. 현재 만들고 있는 게임 프로젝트에 적용한다면 이렇게 적용시킬 수 있다.
// 마우스 클릭 -> 정보 넘기기
private void MouseClick()
{
    if (Input.GetMouseButtonDown(0) && selectArea != null)
    {
        switch (currentAction)
        {
            case PlayerAction.Attack:
                if (!isFriend) {
                    DirectPlayer_AttackToEnemy(selectArea);    // 적군 공격 명령
                    currentAction = PlayerAction.None;         // 행동 후 초기화
                }
                break;
            case PlayerAction.Move:
                if (isFriend)
                {
                    DirectPlayer_Move(selectArea);      // 아군 지형 이동 명령
                    currentAction = PlayerAction.None;  // 행동 후 초기화
                }
                break;
            case PlayerAction.Item:	// 아직 아이템은 미구현
                break;
            default:
                Debug.Log("행동을 선택해주세요");
                break;
        }
    }
}
마우스를 클릭했을 때 행동 상태에 따라서 PlayerController가 명령을 내릴 수 있다
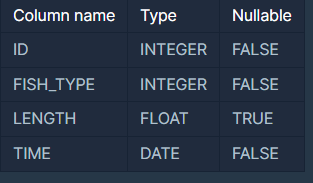
2. FISHI_INFO에서는 물고기 이름이 없으니 FISH_NAME_INFO에서 배스랑 스내퍼의 이름을 조인을 통해서 구한다.
SELECT COUNT(*) AS FISH_COUNT
FROM FISH_INFO INNER JOIN  FISH_NAME_INFO
ON FISH_INFO.FISH_TYPE = FISH_NAME_INFO.FISH_TYPE
WHERE FISH_NAME_INFO.FISH.NAME IN ('BASS', 'SNAPPER');
+ 추가적으로 보기 헷갈리니 별칭을 통해서 만들어주면 끝
FISH_INFO = fi , FISH_NAME_INFO = fn
SELECT COUNT(*) AS FISH_COUNT
FROM FISH_INFO as fi INNER JOIN  FISH_NAME_INFO as fn
ON fi.FISH_TYPE = fn.FISH_TYPE
WHERE fn.FISH_NAME IN ('BASS', 'SNAPPER');
1. 두 수가 크면 약수를 구하기 복잡해진다. (ex. 26552와 46552의 최대 공약수는?)
2. 약수 찾기가 어려운 경우 (ex. 403과 155의 최대 공약수는?)
인간의 대선배님들은 쉽게 구하는 방법을 후세를 위해서 남겨주신 것이다.
- 유클리드 호제법을 이용해서 최대공약수 구하기
일단 두 수(a > b)가 주어지면
1.더 큰 수(a)에서 작은 수(b)를 나눈다. : a / b
2. 작은 수(b)에서 나눈 값에서 나온 나머지(a % b)를 나눈다. : b / (a % b)
3.나머지가 0이 될 때까지 반복한다.
이를 코드로 표현해보자면 이런식으로 표현할 수 있다.
        // 최대 공약수(Greatest Common Divisor) 구하기
        public static int GCD(int a, int b) {
            int temp = 0;
            while (b != 0) {
                temp = b;
                b = a % b;
                a = temp;
            }
            return temp;
        }
- 프로그래머스에서 풀었던 전체 코드 (분수 계산하기)
internal class Program
{
    // 최대 공약수(Greatest Common Divisor) 구하기
    public static int GCD(int a, int b) {
        int temp = 0;
        while (b != 0) {
            temp = b;
            b = a % b;
            a = temp;
        }
        return temp;
    }

    public static int[] solution(int numer1, int denom1, int numer2, int denom2)
    {
        numer1 *= denom2;
        numer2 *= denom1;

        int temp = numer1 + numer2;
        int tempdenom = denom1 * denom2;

        // 최대공약수 구하고 약분하기
        int gcd = GCD(temp, tempdenom);
        return new int[] { temp / gcd, tempdenom / gcd };
    }

    static void Main(string[] args)
    {
        // Program program = new Program();
        Console.WriteLine(string.Join(" ", solution(1, 2, 3, 4))); // 5 4
        Console.WriteLine(string.Join(" ", solution(9, 2, 1, 3))); // 29 6
    }
}